
General Requirements for Glue Space Template
Current Glue spaces use Unity version 2021.3.4f1
Use URP(Universal Render Pipeline) for rendering and materials.
Make sure any custom shaders you have work with URP. Shaders such as CameraOpaqueTexture and CameraDepthTexture aren't usable on standalone VR devices.
Everything used in a scene should be located inside a folder, named by your spaces name, located under Unity projects Assets.
Scene or the scenes asset folders must not contain any scripts and must be removed before providing the Unity space asset to Glue.
Post processes are disabled in Glue, light your scene in Unity accordingly.
For performance reasons, standalone VR platforms are restricted to 1 real-time light (no shadows).
Although "baked indirect" lighting mode can generally be used, it behaves differently in standalone VR devices because real-time cast shadows are not rendered in said platforms. Use "subtractive" mode instead as it renders similar results in all platforms. It is also less GPU intensive, therefore performance might be better in heavier scenes.
In subtractive mode, normal maps do not affect the outcome in baked geometry on standalone VR platforms. This is because directional mapping is not used in lighting calculations. However, static objects lit with light probes utilize normal maps on all platforms.
Optimization considerations
The scene must be light so that it runs on standalone VR devices, unless it is only meant to be used on more powerful platforms like gaming PCs.
Use occlusion culling unless your space is very small and everything in it is constantly visible to the user. https://docs.unity3d.com/Manual/OcclusionCulling.html
Limit the number of individual objects, materials, and textures. For example, it is bad for performance if a model of a house would have every screw as an individual model.
Individual objects must be kept as light as possible and if high-resolution meshes are required for close-up appearance, use LODs.
Don’t use large textures. Keep in mind that it is always better to have fewer textures and then minimize their size. Use texture atlases.
Keep the number of light maps as low as possible. Fit all lighting data to one or two 2K maps. Exclude surfaces that are not visible to the user from the light maps.
To save lightmap space, do not bake light on geometry that is transparent, such as windows, emissive, or not visible at all from the navigable area such as outside roofs.
Your scene must not exceed 100k polygons visible to a user at any given time, on any location in the scene. It is better to keep polygons lower (50k or less)
Combining any models that are visible at the same time
Aim to keep the number of draw calls under 300 for mobile platform performance reasons. Avoid transparent draw calls as much as possible, they are more expensive on performance. Try to keep transparent draw calls below 20. (use “Frame Debugger” to test.)
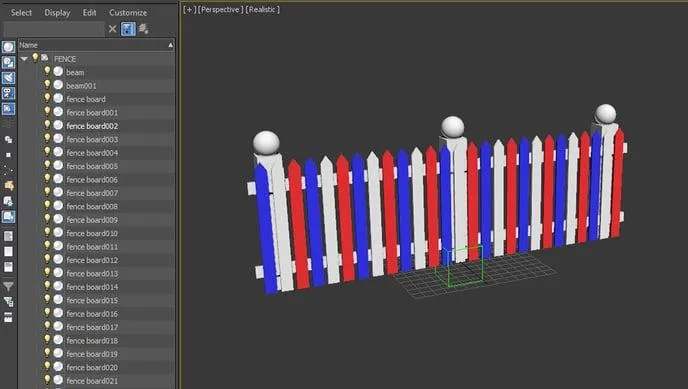
Model optimization, practical example.
Let's say we have a model of a fence that we want to optimize for use in Glue.

It consists of 32 individual parts or objects as we usually refer to them. It also has 3 materials, one for each color. And the polygon count of 3480 triangles is fine for real-time use on stand-alone devices.
If we were to use this model in Glue it would consume one draw call for each object/part multiplied by the number of materials per object. So if one object has two materials it will consume 2 draw calls. This is not optimal. We want to use as few draw calls per model as possible.
In this case, we only have a single material assigned to any one object, so we would consume 32 draw calls for this model (+1 for the ground).

Combining objects
To reduce the number of draw calls needed, we can combine objects in a 3D program. In this particular case, we have no use for separation between individual objects so we can combine all of them into a single object. This will reduce the number of draw calls needed for the model from 32 to 3.

1 object x 3 materials = 3 draw calls (+1 for the ground).
This is already pretty good, but we can further optimize by reducing the number of materials to one.
Combining materials
To combine materials we can use a small 256 x 256 pixel texture with all the colors we need for this model and UV map each object to the area of that color in the texture. This is usually referred to as an atlas map. This can be made either by hand or using a baking function in the 3D program used. For more information about texture, and baking refer to your 3D program's user manual.
Similarly, we can also transfer other material properties to a map if needed.

Atlas map for our fence model on the left and UV layout to assign the colors on the right.

Our optimized model is now using only 1 draw call (+1 for the ground).
Creating a Glue space asset to be used as a template
1.Create aURPUnity project with the current Glue unity version.

2.Your space should be located in a single folder under “Assets”. This folder should contain everything used in the scene.

If you are sending your project to us instead of preparing it yourself to be available in Glue, this is the folder you will send to us. Read more about providing a prepared Unity scene to us here.
Save the scene with a name that refers to what you want the space to be called. Use underscores instead of spaces.

3.Once you have your scene geometry setup, you can add some basic Glue functionality. Some of these are mandatory and some are optional.
Colliders for teleport surface (Floor), walls/objects you don’t want the user to be able to teleport in or through, and objects you may want the user to be able to pick up (these will need to be scripted functionally to be added later by our developers). Collider types that can be used are Box Collider, Capsule Collider, Mesh Collider and Sphere Collider.
To tell Glue what kind of function these objects with colliders are going to have, we use the Unity layer system with a reserved layer number for each different kind of behavior. The name of the layer isn’t strict, but the number is so that our system can determine what the desired use is for that particular geometry.

1. Floor→User Layer 12is for all the teleportable surfaces you wish the user to be able to walk on.Mandatory(needs colliders)
2. Wall→User Layer 17blocks the teleport beam and prevents the user from teleporting inside or through them.
Optional (needs colliders)
3. Grabbable→User Layer 13is for any scene objects that you may wish the user to be able to move. To enable the functionality Glue developers will later need to add scripted functionality to these objects.
Optional (needs colliders)
Light probe Group is used to pass light information in the scene to our avatars and other dynamic objects. Include it in the scene as it will make avatars and other dynamic objects respond better to different lighting conditions in the scene. The basic configuration of probes can vary depending on the lighting in the scene. Rule of the thumb is that areas of notable light changes should have probes. Good practice for any probe spot is to have one at knee height and another at head height. Make sure light probes are not located inside geometry.

Spawn point. This is the point that users will start when they enter the scene. There are two methods that can be used. Mandatory
1.The simplest method is to place the ground at 0 in the Y axis and the world origin (0,0,0) will then act as a spawn point for users entering the scene. Avatar facing direction is based on z-axis direction, set the space accordingly

2.A spawning plane. Any planar geometry the size of your choosing with a collider. Tag it as “Respawn”.

From here on you have two options on how to add the space to your Glue team. Either by preparing and uploading the Template by yourself using our GlueSDK Unity extension to create a Glue Space Template, or by providing us the Unity scene as an archive file you have prepared so far.